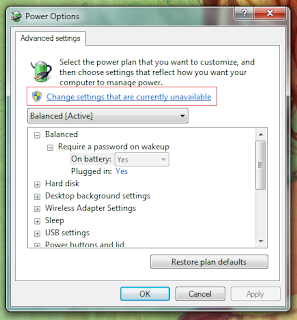
When it comes to desktop UI designs it maybe true that you can learn a lot of from Apple Mac but the Gnome desktop developers can also learn a great deal from Microsoft. For instance, in Windows 7 (including Vista) Microsoft has done an excellent job of creating a pretty simple power related configuration window which is really good for the newbies since it doesn't "touch" a lot of advanced settings.
But unlike with the GNU/Linux default desktop, the Gnome, if you'd rather like to have some additional control over the computer then you easily do so in Windows 7. Most of the average users like me know how to do this. But for those who don't ... this is how you access that additional configuration settings that lets you change a big list of advanced settings concerning the ACPI of your PC.
1. First click on the Batter or the Charger icon on your notification area and from the window choose "More power options" as shown in the below screenshot.
2. Then from the next window that you get, choose the "Power plan" that you want these settings to be applied and click on the Link next to it that says "Change plan settings" which should bring a new window similar to the below one.
3. From the next window that you get, look for the bottom section and click on that says "Change advanced power settings" as with below picture.
Once you click on this link you should be reveled by a new window that lets you configure a lot of advanced power settings concerning your hardware through the ACPI (advanced configuration and power interface, a standard) and using this you can change some big number of settings such as:
 |
| Note: If you click on the "Change settings that are..." (marked in Red) link, then it'll only display the settings that are not available in the default/simple configuration window... |
*. Pause the desktop background slide-show.
*. Change whether the Wireless adapter should give you the maximum performance or maximum power efficiency.
*. Enable/disable wake timers, change auto hibernate time or enable the Hybrid sleep mode (turned on by default for Desktops), etc.
*. PCI Express cards related settings.
*. Change Advanced Processor related settings such as: Cooling policy, Minimum processor state or Maximum processor usage limiter (which can have a significant effect on your battery life if you know how to balance things a bit :D), etc.
*. Display related settings.
*. Multimedia related settings such as : Enable/Disable media sharing, switch between performance and low power mode while playing videos.
*. Internet Explorer related Javascrpt timer setting.
*. GPU related settings.
My personal favorite is few of the settings that this window allows you concerning the battery. For instance, if you're trying to calibrate your battery then sometimes it's important to let it completely drain itself (0% or somewhere near). But by default, Windows will put your Laptop into Sleep mode when it reaches a certain point in its battery life (default is 7%) which is called "Reserve battery level".
But if you forcefully disabled it then when the battery reaches about 5%, Windows WILL put your computer into Hibernate mode which in this case (we're trying to calibrate the battery, remember? :D) is not what we want since we'd like our battery to die to its absolute zero or close. So in that case, you can use this window to re-configure and completely disable that default action which is very handy in my experience.
But once you're done with the calibration make sure to set things in their default values since these power modes do help to recover your PC from failures. Also remember except for some (such as the mentioned "Better critical..." settings) most of these settings are automatically adjusted when you change settings in the "Power Plans' window. But this configuration window gives a lot of advanced options that are sometimes necessary to get the most out of your PC nonetheless. Good luck.


0 comments:
Post a Comment